Making a Corian® Lithophane using Vectric’s PhotoVCarve
Corian ®: Invented and manufactured by DuPont, is a solid surface material.
The material looks and feels like stone, but is referred to as family of plastics.
One of the features is that it is translucent, and therefor perfect for a Lithophane.
What is a Lithophane? The word Lithophane comes from the ancient Greek era “appear in stone”.
A lithophane is a way of making 3D images appear in materials such as stone.
These will only be visible once back-light behind the Corian is lit to shine true the engraving.
I have got a lot of requests of showing how to make a Litho using Vectric PhotoVcarve.
This piece of software can do much more then just litho’s and there are more tutorials to come.
Special thanks goes out to the Vectric company for supplying this great software.
The Tutorial below is in addition to the Video.
Please read the text, and watch the video for the complete story 😉
Step 1 : Photo editing…
Of course the first thing to to is find the picture we want to make a litho from.
And do all the editing you want, like background erasing, changing the aspect ratio etc.
For this tutorial i will leave the background as is, and change the ratio to 8×6.
No need to set the size of the picture, as this can be done in PhotoVcarve later on..
A Lithophane uses light and dark areas in the picture to map the relief.
Therefore i adjust the brightness and/or contrast to suit my preferences.
Save the picture in a format that Vectric PhotoVcarve can handle :
BMP, JPG, TIF, PNG & GIF
Step 2 : Designing the Lithophane using Vectric PhotoVCarve…
PhotoVcarve from Vectric is a great piece of software for CNC fanatics.
I highly recommend this software.
For cutting the Lithophane i will do 2 passes on the machine.
A Roughing pass to remove the bulk off material,
and a finishing pass to get the resolution and quality i want for the final product.
These two passes will get there own settings, and G-code output as shown in the video.
Open image tab
First step in the software is to open the image that we saved in Adobe Photoshop earlier.
We could now select a color to make transparent, used to delete backgrounds with.
I will not do so in this tutorial as i want to have all the details left in to the Lithophane.
Set Material Size tab
In Photoshop i cropped the image to a ratio of 8×6, and did not set the actual size.
The Corian im using is 7″ x 5″ at a 1/4″ thickness, so this is : 177,8 x 127 mm and 6,35 mm thick.
Filling in a height of 110mm sets up the width of 146.751 automatically.
I set the Origin to the center of the picture, center is x=0 and y=0.
This is just my personal preference , you might want to do otherwise.
I used different software for the cut-out contour so this is done to lineup the two programs.
Z Zero is on top of the material in my case, so all cutting is negative…
And material thickness is 1/4″ or 6,35 mm in metric value.


Set Cutting Parameters
For the roughing pass i use a 3mm ball nose cutter.
This cutter will be used to remove the bulk of material.
Select a ‘Pass Depth’ with a minimum of the actual pass, actual is 2,5 mm so set Pass Depth at 3mm.
(Setting it to 1,25 for example will not work as a multi-pass, if you want this just use the multi-pass in Mach3.)
Feed is set on 1800mm/min, and Plunge @ 750, this setting depends on your machine…
For Carving depth of the actual litho is set to 2,5mm, for me this seems best…
The 2,5mm is the difference between the lightest and darkest pixel of the picture.
Line Spacing is set to 50% for the roughing cut.
This is 50% of the 3mm cutter, so PhotoVCarve will make a cutting action every 1,5mm.
Line Angle is set to 45 degree, this way the cutter make diagonal lines.
This is the best setting to preserve the cutting tool.
The first cut is the only cut that has to take away full cutter diameter of material.
The remain cuts only take away the 50% we set earlier.
Setting the Line Angle to 45* makes the first cut a very short one…
Select Invert Light / Dark areas for lithophane cutting.
This makes the cutter to go in deep on Light area’s, and less deep on dark areas.
The rapid clearance is the Z height of the cutter on G00 moves…
This should be a minimum of the OFFSET value (offset will be explained in Step 3).


Preview & Save Toolpath
In the preview we can check what the litho would look like after cutting.
For now i just select a white fill color to show you guys what the result would be.
Of course after just the roughing cut it will not be a good result…
To know what the machining time would be you will have to experiment.
For me the rapid speed of 2000, and a scale factor of 1.1 gives a good result.
As seen the Roughing pass will take aprox. 7 minutes…
Save the PhotoVCarve file, and export the G-code.
Finishing pass
For the finishing pass i will only talk about the differences.
Set Cutting Parameters
For the roughing pass i use a 3/64″ ball nose cutter (about 1,2mm).
This is a much smaller cutter then the cutter from the roughing pass.
The smaller the cutter, the higher the resolution of the result will be.
For the line spacing of the finishing cut we have to use a much smaller value.
For this size of picture 10% gives a very good result.
A smaller value gives a better result, but takes more time to cut.
Preview & Save Toolpath
Now we can see the final result in the preview window…
And we see that the small line spacing + small tool makes 1,32 Hour of cutting.


Step 3 : Cutting the actual litho…
For the actual cutting of the Roughing Toolpath checkout the video.
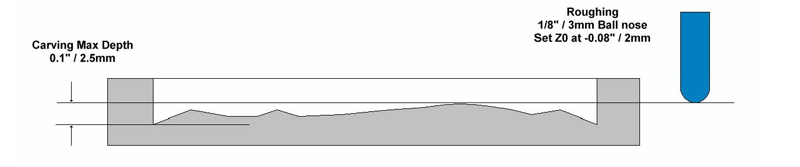
The first step is to Zero out the Z-axis on top of the material.
After that you see me put in an offset of 2mm in the screen…, let me explain this.
For the Lithophane we use a ‘Carving Depth’ of 2,5mm.
The material is 6,35mm thick in this case.
This would leave a minimum of 6,35-2,5mm= 3.85mm of Corian untouched on the bottom.
This would be way to thick for the light to pass trough, making the Litho worthless.
So for the roughing cut, lets take another 2mm material of, on top of the 2,5mm Carving.
This can be done by setting Z-Zero 2mm into the material…
See the picture below, and see video @ 5:40
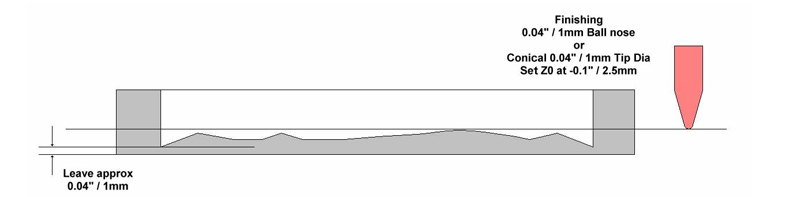
After the Roughing pass is done we can start with the Finishing pass.
As mentioned before i have done this with a 3/64″ ball-nose.
In the video @ 07:20 you can see that again i put in an offset after the tool zero.
This time its an even higher offset, 2,5mm to be exact.
Why the extra 0,5mm ? Well to make sure this finishing tool touches every spot on the Litho.
This tool makes the cut we want to see, and not the roughing cut.
So what do we have now….
6,35mm material thickness – 2,5mm offset – 2,5mm Carving = min. 1,35 leftover material.
Again a picture below to illustrate.
Vectric it self made a great tutorial them self’s check it out : Vectrics Lithophane tutorial
Step 4 : Making a picture frame with back lighting …
The making of the picture frame is not part of the tutorial.
I made this using non-Vectric software, because i do not own a copy of this (to-bad).
The picture frame it self ‘could’ have been done by Vectric Cut2D.
And the Frame including the V-carved text ‘could’ have been done using Vectric VCarve Pro.
The stairway profile on the back is done to place the 5050 RGB led-strip at an indirect angle.
This indirect approach gives the best result, with a direct approach you would see bright spots.
Step 5 : Show off your creation… 🙂
![]()
If you made your own using the help of this page…. Come on show it 🙂
 © 2012-2024 RoboCNC.nl | RoboCNC.be | RoboCNC.eu - All Rights Reserved.
[..YouTube..] Very Nice Work!!!
[..YouTube..] that is very cool
[..YouTube..] which company is the router of
[..YouTube..] @karandex My friend please take a look on my website, this router is DIY build 😉
[..YouTube..] @Marcelmx3 i am talking about spindle
[..YouTube..] @karandex Oke… not sure if that would be on the website :)Its from germany, brand Kress type FME1050.The nice thing about it is that there are a lot of collets for? this type…
[..YouTube..] very very very good work!!!!
[..YouTube..] @h0pl1t Thanks !!
[..YouTube..] Really nice work!
[..YouTube..] @DJGacke Thanks Dj….
[..YouTube..] Awesome, thank you. I’m going to try one this evening on my router.
[..YouTube..] @TheLonetreecreations Good luck…. And if it worked out just let us know 🙂
[..YouTube..] Made my first 2 lithophanes over the weekend. I cut them out of HDPE I machined down to about .140″. I cut it using PhotoVcarve software at .080 max depth. My first one I cut was at .005″ overlap and 5 inches per minute. This 4″ x 3″ litho took 64,000 lines of GCode and 6 hours and 35 minutes to finish. It came out amazingly well. I’m? so excited about it. My second one was the same size but I increased the feed rate to 15″ a minute and got that one down to 2 hours 5 minutes. I love these things.
[..YouTube..] @TheLonetreecreations Wow…. 64000 lines… 🙂 no wonder the result must me great? :)Thanks for sharing, and dont forget to upload 😉
[..YouTube..] Good lesson … thanks … 😉 …
Good lesson … thanks … 😉 …
[..YouTube..] @velleca55 No thanks…. Its credits in the comments like this why i do so….
@velleca55 No thanks…. Its credits in the comments like this why i do so….
@velleca55 No thanks…. Its credits in the comments like this why i do so….
@velleca55 No thanks…. Its credits in the comments like this why i do so….
[..YouTube..] Wow I know more 🙂 this was very good thanks.
[..YouTube..] Thanks a lot and keep them coming, great work, enjoy looking at your work very muchCheersSpyker?
Thanks a lot and keep them coming, great work, enjoy looking at your work very much Cheers Spyker
[..YouTube..] @spykerbotdotcom Thanks Spyker? ! I will keep them coming 🙂
[..YouTube..] @NuttyforNissan Thanks Nutty 🙂
@NuttyforNissan Thanks Nutty 🙂
@NuttyforNissan Thanks Nutty 🙂
@NuttyforNissan Thanks Nutty 🙂
[..YouTube..] That is amazing 🙂 thanx for sharing
[..YouTube..] Nice job!!!!!
[..YouTube..] @4m3DCreativeDesign Thanks Todd !
[..YouTube..] Thanks Todd !
[..YouTube..] @LoomisRex Thanks for the Thanks… 🙂 Comments like this, are why i post? it 😉
@LoomisRex Thanks for the Thanks… 🙂 Comments like this, are why i post it 😉
@LoomisRex Thanks for the Thanks… 🙂 Comments like this, are why i post it 😉
@LoomisRex Thanks for the Thanks… 🙂 Comments like this, are why i post it 😉
[..YouTube..] @RoboCNCnl I built my own CNC routing table and am looking into cutting acryllic signs. Your videos are very inspiring. Just wish i had better success at cutting acryllic. it’s always rewelding on me. Am waiting for a smaller router bit (3 mm) hoping that will give better results.Keep posting 🙂 thanx again 🙂
[..YouTube..] @LoomisRex Thanks for the comment, please take a look at my other video’s for Acrylic tutorials.
@LoomisRex Thanks for the comment, please take a look at my other video’s for Acrylic tutorials.
@LoomisRex Thanks for the comment, please take a look at my other video’s for Acrylic tutorials.
@LoomisRex Thanks for the comment, please take a look at my other video’s for Acrylic tutorials.
[..YouTube..] Nice work Marcel! I hope all is well my friend. Best regards, -Hank “jdsprince” / “TwinMountainMetalArt”
Nice work Marcel! I hope all is well my friend. Best regards, -Hank “jdsprince” / “TwinMountainMetalArt”
[..YouTube..] @TwinMountainMetalArt Thanks Hank ! (Sub’d your new channel to 😉
@TwinMountainMetalArt Thanks Hank ! (Sub’d your new channel to 😉
@TwinMountainMetalArt Thanks Hank ! (Sub’d your new channel to 😉
@TwinMountainMetalArt Thanks Hank ! (Sub’d your new channel to 😉
Hey, awesome info here. I am quite interested in getting into making lithophanes. I am a tool and die maker by trade and use CNC milling equipment daily. My biggest thing to figure out at the moment is what kind of router to get. What were you using in your video? Was it a K2? It appeared to handle the PhotoVCarve toolpath very well. Good job, looked great.
Hi Paul,
Lithophanes are great to make indeed…
I think you can make litho’s at all CNC machines, all with there own settings and speeds.
Have a better look around on this website and you will find out that the router i have used is DIY.
I made this one my self, and named is the RoboCNC X1 Router (as there will be a X2 in the near future)
[..YouTube..] video e musica stupendi , il lavoro da artista , una meraviglia .
video e musica stupendi , il lavoro da artista , una meraviglia .
[..YouTube..] La ringrazio molto …
@umbidona La ringrazio molto …
@umbidona La ringrazio molto …
@umbidona La ringrazio molto …
Another great tutorial.
I am really enjoying looking at these.
Is there a way to save them so I can look at them again and again offline?
I am a slow learnet 😉
Cheers
Wolffie
Wolffie,
You can click on the printfriendly in the bottom of the post.
From there you can print it, or make a pdf from this page.
Cheers
To by honest i can not remember… But jobs like these do take a long time, ,maybe close to 2 hours…
To by honest i can not remember… But jobs like these do take a long time, ,maybe close to 2 hours…
To by honest i can not remember… But jobs like these do take a long time, ,maybe close to 2 hours…
The final product was beautiful! Makes me want to try out CNC and lithophane production.
Thanks eddyogi ! If you own a CNC Machine you must try this out…
Thanks eddyogi ! If you own a CNC Machine you must try this out…
Thanks eddyogi ! If you own a CNC Machine you must try this out…
Excuse me please. What is the milled material? Great job, thanks
Thanks for the tutorial. After a few tries my litho came out beautiful.
Thanks for the comment Larry ! Glad the tutor helped you !
Nice work !
Thanks !
Thanks !
Thanks !
ik krijg dit nie op de wereld om dit op 1u40 minuten af te krijgen ik werk met usb cnc als stuurprogramma en bij mij duurt zoiets 6u30min mvg tommy
Dat zou heel goed kunnen Tommy, dat verschilt enorm per machine. USBCNC is absoluut niet het probleem hoor. Voor tijdwinst in dit soort werk is een zeer hoge acceleratie snelheid nodig van de freesmachine. Wellicht dat u daar nog ergens winst in kan proberen te krijgen.
Dat zou heel goed kunnen Tommy, dat verschilt enorm per machine. USBCNC is absoluut niet het probleem hoor. Voor tijdwinst in dit soort werk is een zeer hoge acceleratie snelheid nodig van de freesmachine. Wellicht dat u daar nog ergens winst in kan proberen te krijgen.
Dat zou heel goed kunnen Tommy, dat verschilt enorm per machine. USBCNC is absoluut niet het probleem hoor. Voor tijdwinst in dit soort werk is een zeer hoge acceleratie snelheid nodig van de freesmachine. Wellicht dat u daar nog ergens winst in kan proberen te krijgen.
Very good work. What would other material to replace the corian, here in my area I can not find this stuff.
First of all, congratulations for your work. I saw all of your videos and they are great! May I ask you an advice? I do live in Brazil and I’m finishing my own router. Can you tell me the brand and model of the motors and drivers you use in your projects and the G00 speed you can achieve? I’m asking this because on my 100 kgf/cm motors I could only achieve 1400mm/min (G00 and G01). Beside this the motors stalls. I’m using 20mm diam. rolled ballscrews with 5mm lead. Thanks for any help! Cheers.
Hi There… Please have a look at our website for all information about the router build. I can not compare your motors, its really depending the machine… By the way, maximum speed g00 has way more to do with the voltage you supply as it has to do with the max holding torque. For further information, and questions please refer to the correct pages on our website.. Cheers
Hi There… Please have a look at our website for all information about the router build. I can not compare your motors, its really depending the machine… By the way, maximum speed g00 has way more to do with the voltage you supply as it has to do with the max holding torque. For further information, and questions please refer to the correct pages on our website.. Cheers
Hi There… Please have a look at our website for all information about the router build. I can not compare your motors, its really depending the machine… By the way, maximum speed g00 has way more to do with the voltage you supply as it has to do with the max holding torque. For further information, and questions please refer to the correct pages on our website.. Cheers
Where do you get your bits from
Bedankt 😉 !
Bedankt 😉 !
Bedankt 😉 !
Perron!
So.. I have sucked in pretty much all of your videos. :DAre the drawings for your machine available for download?